-
Save Energy (And Money) By Replacing Your Home’s Thermostat: Here’s How
 Share on Facebook
June 11, 2017
Your thermostat regulates your home’s heating and cooling.
So you need to make sure it’s working correctly at all times.
By replacing an inefficient thermostat, you can save big money on air conditioning this summer.
And replacing it, is actually pretty simple when you know how.
Here are the simple steps…
1. Purchase the proper replacement thermostat.
Review the compatibilities on the manufacturer’s packaging. Most replacement thermostats are compatible with all common systems.
If you have a unique system, you may have more trouble finding a replacement.
Here are your basic thermostat options:
- “Works with 1 stage heating or cooling”: Used with units featuring separate heating and air conditioning units.
- “Works with 2 stage or multi-stage heating or cooling”: Used with units featuring designated high and low speeds.
- “Works with direct line voltage”: Used with 110 or 240 direct current power sources to power the thermostat.
- “Works with 24mV”: Used with fireplaces, floors, or wall furnaces.
- “Zoned HVAC”: Used when both heating and cooling are individually controlled in different areas from the same system.
2. Review the manufacturer’s instructions for wiring your replacement thermostat.
Most thermostats use similar installation methods. Still, it’s beneficial to read all the materials and preview all the pictures provided for how to install your new thermostat. Match what you do detail-to-detail, step-by-step.
3. Shut off the power to your thermostat.
Turn off the thermostat switch at the breaker box. Turning off the power to the thermostat reduces the chance of any electrical injuries.
4. Remove the old thermostat from the wall.
Just about all thermostats slide upward from where they are attached to the wall. Loosen the screws that attach the wall plate to the wall, if there is one. Many thermostats have a base and sub-base. You need to remove the entire thermostat, until all you’re left with are exposed wires and a bare wall. If the wires are corroded, scrape the ends with a utility knife until they are shiny.
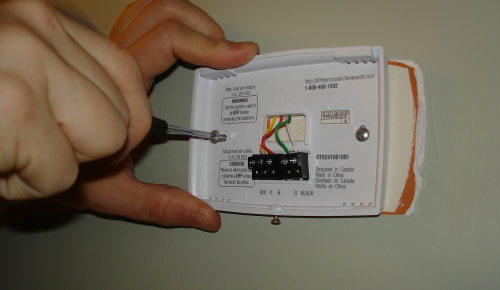
5. Pay attention to how the old thermostat is wired as you disconnect it.
This is the most important step.
Most thermostats wires are coded. And some are coded incorrectly.
So, with a piece of tape, write a letter on each wire, matching the letter of the connection on the thermostat base. If the blue wire was in connection B, write “B” on the piece of tape, and put the tape on the wire. Label or designate any wires that were loose and unconnected to your thermostat as well.
Ignore the colors of wires, except for your own identification purposes. Thermostats wired by non-professionals do not usually adhere to codes, so the colors may not match as they should.
6. Keep all disconnected wires hanging out of the wall.
Tie the wires together or tape them to the wall to keep them from falling back into the wall. A lost wire will turn this process into a mess.
You can even wrap all the wires around a pencil. The weight of the pencil is just enough to keep the wires from going anywhere.
7. Install the replacement wall plate.
Use the new wall plate as a template to mark the holes you need to drill. This way you know where the screws need to be. Use a level if necessary.
Next, drill out the holes and screw the replacement wall plate into its new wall position.
If your new thermostat has a mercury tube, your device needs to be completely level or it won’t render accurate readings. Using a level is very important in this scenario and is not just for aesthetic reasons.
Also, make sure you’re drilling holes that match the size of your screws. A 3/16″ drill bit is fairly standard. Your thermostat will come with screws, and probably some anchors. Make sure to use the anchors, as they support the system on the wall.
8. Hook the thermostat to the wires.
Use your notes or labels to re-connect the wires to the thermostat. You can twist the wires onto the thermostats connectors, or follow the directions provided by the manufacturer.
Your new thermostat should have the same corresponding code on the back, unless otherwise noted in the instructions. If you have doubts or issues, contact a electrician.
Some thermostats are as simple as a two-wire system. Some have five. If you have empty ports or connections, don’t worry. Your thermostat is most likely fine.
9. Place the thermostat on the wall.
Put all the wire length back into the wall.
Place the thermostat flush against the wall, slightly above the wall plate. Now, slide it down so it catches the grooves (or screws) on the wall plate, so it sits perfectly in place.
If your thermostat isn’t in a good location (it’s exposed to drafts or heat, which can mess up the readings, or it’s too high or low for you), you’ll need to contact a professional to have wires moved.
10. Turn the power back on to the thermostat, furnace, and air conditioner.
Activate the proper switches in the breaker box to restore power.
Give it a minute to kick on.
And of course, don’t forget to install the batteries. Most systems require (2) “AA” batteries. Make sure the batteries are brand new, placed in properly, and the positives/negatives are correct
11. Check to make sure the thermostat is working.
Set the thermostat so the furnace and air conditioner come on at different times. Give your furnace and air conditioner at least 5 minutes to activate. If the thermostat doesn’t work properly, retrace your steps to see where you may have made some sort of mistake. You may just need to hit the reset button on the thermostat. Some will not start until the reset button is pushed.
12 Program your thermostat.
Each type of thermostat is different, so read your manual if you have questions. Just remember that a programmable thermostat can save you loads of money —— set it warmer for when you’re gone during the day this summer. It’ll turn off without you, saving you money and saving our planet’s energy.
Hopefully you got a lot out of this article and can now save tons of money every year by regulating your air conditioning.
Builder Supply Outlet and the Edge Showroom carry the top kitchen cabinet brands including Waypoint, Shiloh, Aspect, Eclipse, Prior Creek, MidContinent, and Bertch. Stop in anytime to learn more about kitchen cabinets or make an appointment and meet with an Edge Kitchen and Bath Designer absolutely FREE by clicking here.
Hopefully you’ve learned what you need to know to start shopping for the perfect kitchen cabinet doors!

Feel free to stop into Builder Supply Outlet or the Edge Showroom with any home improvement questions you may have regarding cabinet hardware, bathroom vanity sinks, tops, remodeling, tile, backsplash, cleaning, sealing, grout, windows, kitchen cabinets, construction, contractors, designing/installing a new kitchen or bathroom — or anything else. We can help you through the entire design and installation process from A-Z. Or call us anytime in Broadview, IL at 1-708-343-3900. You can also make an appointment to meet with one of our Edge Kitchen and Bathroom designers at no charge by clicking here.


- My account Cart
-
OPEN TO THE PUBLIC | Store Hours and Information708.343.3900 OPEN TO THE PUBLIC Store Hours and Information
- 708.343.3900 Español Schedule Your FREE
Design Consultation