-
How To Seal A Granite Countertop
How To Seal A Granite Countertop
 Share on Facebook
April 12, 2017
If you’ve got a gorgeous granite countertop, you’ll want to seal it to keep it clean.
And you need to know what you’re doing. Improper cleaning and neglected spills will easily destroy the surface. A good sealer will soak into the granite, filling the porous gaps, so damage is kept at bay. Even with a good sealant – you still need to remove stains when they happen.
Water-based sealants are environmentally friendly. Solvent-based sealants may go deeper into polished granite.
Check water- or solvent-based sealant labels for the active ingredient “fluorocarbon aliphatic resin.” It’s pricier than those sealers containing such agents as siloxane and silicon. Still, fluorocarbon aliphatic resin will provide you 5-10 years of protection, versus six months to three years with other sealants. Fluorocarbon aliphatic resins repel oil and water, so your granite won’t be ruined by something like a salad dressing spill. A quart of fluorocarbon aliphatic resin sealant costs about $35 and offers between 150 to 250 square feet of coverage. A 24-oz spray bottle of a much lesser solvent costs roughly $15 and likely will require reapplication every six months or so.
When sealing, make sure to follow label instructions on the sealant you buy in addition to these handy guidelines for the best results.
MATERIALS
To seal your granite countertop, you’ll need…
- Microfiber cloths
- Spray bottle
- Liquid dishwashing detergent
- Isopropyl or rubbing alcohol
- Granite sealer
- Rubber gloves
- Soft rags
SEALING YOUR GRANITE COUNTERTOP
STEP 1
Apply a few drops of water on your countertop, and a few inches away, put a few drops of oil. After roughly 15 minutes, check to see if the water or oil has seeped in and darkened the granite. If so, proceed sealing your granite countertop. If not, then the countertop is already sealed, and doing so again will not offer extra protection and will leave an unattractive hazy film.
STEP 2
Clean the countertop 24 hours before sealing. Make sure to avoid potentially damaging vinegar, lemon juice, baking soda, bleach, or harsh commercial cleansers. Take everything off the countertop and wipe it down well with a clean, dry microfiber cloth to remove all surface dust. Then, mix one teaspoon of dishwashing detergent and two tablespoons of isopropyl alcohol in a pint spray bottle and then fill it with cool water. Generously spray the countertop and wipe clean while polishing in a circular motion, using a microfiber cloth. Wait 24 hours before proceeding, You must make sure sure that the cleaning liquid has fully evaporated.
STEP 3
Read the sealant’s label thoroughly. Make sure you understand the application method recommended. Should our instructions vary from the label, defer to the manufacturer’s directions. Open nearby windows and doors for ventilation. If it’s raining, do not open windows that could allow rain to hit the granite countertop. Open windows in other areas of the room or in adjacent rooms.
STEP 4
Put on rubber gloves and grab your rags. In an area usually covered by something, test the sealant to ensure it doesn’t affect the finish. Apply a small amount per the manufacturer’s directions. Spray or pour onto a cloth and then rub it evenly over the test area.
STEP 5
Wait the recommended time for the sealant to absorb into the granite countertop. It usually takes 15 to 20 minutes, but sometimes it can take much longer. Don’t let it sit longer than recommended, because that could discolor the stone.
STEP 6
If the sealant test area looks great, proceed to the next step. If it’s discolored, wipe up any remaining sealant with a clean rag and then snap a few photos of the area and show them to an associate at your local home center for advice on a more appropriate product. Once you’ve acquired a new sealant, clean the countertop and test the new sealant.
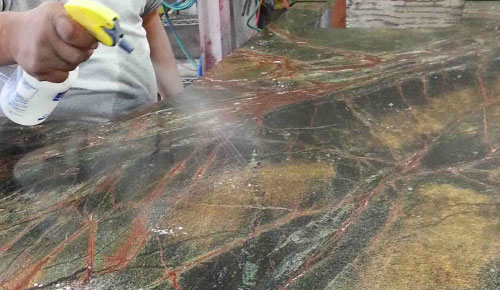
STEP 7
If the test was successful, then you can apply the sealant over the entire countertop, beginning at one end and working your way to the other. Apply in sections, using a circular motion, of an arm’s length in diameter, to ensure equal coverage throughout. Wait until the manufacturer’s recommended time for the product to absorb into the countertop.
STEP 8
After the absorption period has passed, wipe any extra sealant off with a clean, soft, dry rag, by rubbing in a circular motion. Some sealers will require a second coat, so follow the instructions. If the product you use requires one coat, allow it cure. This can take between 24-48 hours. Nonetheless, granite experts recommend waiting a full 48 hours before wiping a newly sealed granite countertop with anything wet. Also, avoid placing any kitchenware on the counter until the countertop is fully sealed/cured.
STEP 9
Once the countertop has fully cured, put your kitchen back in order. Keep the spray bottle of cleaner you created nearby for periodic use every month or two. For daily cleaning, a dab of dish detergent and a wet rag will get the job done beautifully. Always wipe up spills immediately and then dry the countertop to keep your granite looking great.

Feel free to stop into Builder Supply Outlet or the Edge Showroom with any home improvement questions you may have regarding tile, sealing, grout, backsplash, windows, kitchen cabinets, remodeling, construction, contractors, designing/installing a new kitchen or bathroom — or anything else. We can help you through the entire design and installation process from A-Z. Or call us anytime in Broadview, IL at 1-708-343-3900. You can also make an appointment to meet with one of our Edge Kitchen and Bathroom designers at no charge by clicking here.


- My account Cart
-
OPEN TO THE PUBLIC | Store Hours and Information708.343.3900 OPEN TO THE PUBLIC Store Hours and Information
- 708.343.3900 Español Schedule Your FREE
Design Consultation