-
How To Paint Unfinished Kitchen Cabinets
 Share on Facebook
February 2, 2017
Painting kitchen cabinets requires patience and a bit of skill.
Here are some tips for making the process much smoother, garnering great results…
1. Be sure to choose the perfect paint.
Everyday wall paint will not work as it can chip and it won’t stand up to repeated cleaning. Choose an alkyd enamel. This will result in a smooth finish.
2. Choose a color that compliments your appliances.
3. Remove all of the hardware.
Take off all the hinges, remove all screws, the magnets, and even the knob.
4. Take the time to organize the hardware.
Label each door by number beneath where the hinge goes in the frame. Label a plastic baggie filled with that door’s hardware with the same number. Put a small piece of painter’s tape over the number on the door, so when the painting is complete, you can remove the painter’s tape and see the number (place behind the hinge if possible to conceal).
5. Pack your kitchen cabinets orderly.
Pack paper bags or plastic bins for each individual “pantry-like” cabinet. This way the contents can be returned to their home when the job is complete. Stack small appliances out of the way. Keep all frequently used cookware you use most regularly on your cooktop. Put silverware in coffee mugs – one for each spoons, forks, knives, and serving utensils. Best to keep them handy.
6. Be aware of the mess.
Roll up rugs and clear off countertops as a precaution.
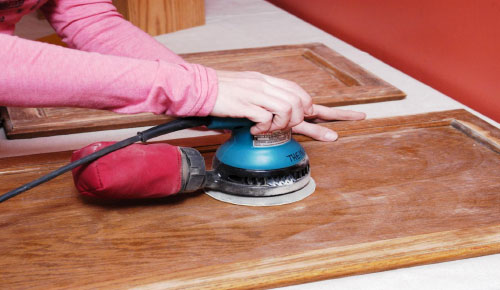
7. Buy or rent an handheld electric sander.
Sanding all of the surfaces is essential for primer and paint to stick. An orbital detail sander will speed up the process, prep the surface, and take a lot of the effort off you.
8. Get plenty of sandpaper.
Buy a large amount of sandpaper to fit your palm sander. You’ll go through it fast!
9. Buy a lot of tack cloths.
Cleaning the surface is just as important as sanding it. Remove the dust and debris after sanding by wiping the surface with a tack cloth. The cloth will remove all of the dust and contain the mess. You may also want to wear rubber gloves as the cloth will make your hands sticky.
10. Use oil-based primer.
Kilz comes highly recommended; specifically the oil-based formula. With the oil-based formula, the hardwood is less likely to discolor painted white cabinets over time (wood is known to “bleed through” and give the paint a tinge of yellow, especially if it’s knotty wood). The oil-based formula also creates a very well-adhered surface to paint.
11. Have the primer tinted.
Prime if you’re painting a dark color to lower the chance of needing multiple coats.
12. Spread canvas drop cloths around the area.
While this process is fairly splatter-free — drips and missteps can happen.
13. Use plastic disposable paint trays.
Place the plastic disposable tray into your “real” tray so you can roll on a firm surface. Throw it out when you’re done for easy clean up.
14. Buy extra brushes and rollers.
Enamel paint cleans with soap and water. Oil-based paint clean-up is a hassle. Spend the money for a few extra brushes to alleviate the awful clean-up.
15. Use baggies or plastic wrap to seal rollers/brushes overnight.
If you’re going to work 2-3 days in a row — seal them up and the paint will stay wet on the bristles, ready for the next day’s work.
16. Choose the right paint rollers.
Have one type for primer and one type for paint. Look for words on the label like “smooth cabinet finish” and “mirror finish.” High-density foam rollers work great for applying oil-based primer. For rolling the paint itself, low-nap rollers actually perform better after they sit, used, wrapped in plastic overnight. The nap lessens, it gets “broken in,” and the finish is spectacular.
17. Painter’s tape is your friend.
There are some inevitably difficult nooks and crannies surrounding appliances where painter’s tape comes in handy.
18. Prioritize the cabinet bases and the backsides of the cabinet doors.
Sand everything all at once if you can. Next, prime and paint the cabinet bases and backsides of the doors. Paint the fronts of the doors last to prevent the potential for extra scratching during the process.
19. Apply light coats of paint to avoid drips.
20. Add a polyurethane topcoat.
The extra coat finishes off the surface. It also creates a barrier for the paint finish to protect it from wear and tear. Use either a high-density foam roller or an “enamels and clears” low-nap roller to apply the topcoat evenly.
21. Paint the insides of your cabinets.
Paint the upper cabinets as you’ll be looking at them each time you open the doors. It’s worth the extra effort to sand and paint the insides, including the bottoms of the shelves that you’ll be glancing at when you reach for something on a high shelf.
22. Add contact paper and/or paint the inside shelves.
Contact paper adds additional cost but is easier to clean and replace over the years, without any damage.
23. Clean the hardware.
To clean metal hardware, mix some water and Bar Keeper’s Friend. Then soak it to loosen years of grime. Wipe down each piece with a wet cloth. Let it dry completely before installing again.
24. When reinstalling, attach the hardware to the door first and then install the door to the cabinet.
You should be able to see the old screw holes. Use those holes as a guide for the reinstall so the doors fit evenly and accurately.
25. Use a helper for installing upper cabinet doors.
Lower cabinets are reasonably easy to balance and install by yourself. Having an extra set hands when you’re working above your head makes things a lot easier, safer, and less messy.
Feel free to stop into Builder Supply Outlet or the Edge Showroom with any home improvement questions you may have regarding kitchen cabinets or anything else. Or call us anytime at 1-708-343-3900. You can also make an appointment to meet with one of our designers at no charge by clicking here.


- My account Cart
-
OPEN TO THE PUBLIC | Store Hours and Information708.343.3900 OPEN TO THE PUBLIC Store Hours and Information
- 708.343.3900 Español Schedule Your FREE
Design Consultation