-
How To Install Kitchen Wall And Base Cabinets
How To Install Kitchen Wall And Base Cabinets
 Share on Facebook
March 7, 2017
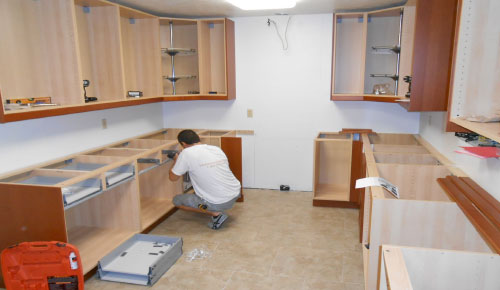
The following are the basic steps for installing kitchen wall and base cabinets and doors…
Step #1: Measure and Mark the Wall
Measure the height of the base cabinets. Most standard cabinets are 34-1/2” high. Add 1-1/2” for a standard countertop and 18″ for a standard backsplash. Some designers are going with a 20-inch backsplash to make room for small appliances. With an 18′ backsplash, the total measurement should be 54″ from the floor to the bottom of the upper cabinets. If your floor isn’t level — then just measure from the highest point along the wall.
Draw a horizontal line across the wall at the 54″ point. This will serve as your guide for hanging the cabinets. Use a level to make sure the lines are perfectly horizontal.
Use a stud finder to locate the wall studs. The studs are crucial for supporting the cabinets. (Pay special attention to the position of all electrical wiring and plumbing.)
Step #2: Secure Ledger Board
Secure a ledger (support) board to the wall. Screw it into the marked studs to temporarily support the weight of the cabinets. Make sure the doors and hardware are removed to make the cabinets lighter and easier to install.
Step #3: Hang the Wall Cabinets
Attach as many cabinets together as you can safely lift and install on the ledger board. Usually it’s just two. Use clamps to fix the stiles (the vertical pieces on the face of the cabinet frames) of the cabinets together and check for plumb, making sure the fronts of the cabinets are flush.
Next, pre-drill and secure the two cabinets together at the stile with the screws. Secure one screw on the top and bottom in the front and back where the two cabinets meet.
Lift the cabinets onto the ledger board and check for plumb and level. Shim the cabinets if necessary.
Next, secure the cabinets into the wall at the studs. Pre-drill and secure the screws through the thicker framing piece along the top of your cabinets.
Check for plumb and level while you’re securing the cabinets. Repeat this process for each of the cabinets. If any gaps exist between the wall and the last cabinet, use a filler bar to enclose the gap. Before securing the last cabinet, measure, mark, cut and secure this piece to the side of the last cabinet.
After all the cabinets are in place, attach the doors and hardware (see below). Remove the ledger board when you are finished installing the wall cabinets.
The following are the basic steps for installing kitchen base cabinets and doors…
Step #4: Install Base Cabinets
If the floor isn’t level, find the highest point in the floor along the wall where the cabinets will be installed. Try to start the base cabinet installation as close to this high point as possible. It’s easier to shim under the cabinets on the lower spots to make them level with this first one, rather than starting on a low point and having to trim the bottoms of the cabinets while working “uphill.”
Measure base cabinets and use the pencil and level to mark a level line on the wall from the high point in the floor to the cabinet height. Be sure to use a level to assure this line will be horizontal.
Use the stud finder to locate and mark the studs along this line around the room.
Dry fit your first cabinet into place and check for level across the top. If needed, shim until level.
Next, pre-drill through the top framing piece into the wall studs and secure the cabinet into place with screws. Spot check the level after securing the cabinet.
Repeat this process until all of the base cabinets are installed.
And finally, attach the doors and hardware (see below) after all of the cabinets are in place…
QUICK NOTE: Before installing any cabinet — remove the door so it doesn’t get damaged or interfere with your installation. When removing the doors, drive the wood screws back into the styles of the cabinets so they don’t get lost.
Before you can reinstall the doors, you’ll have to remove the screws and set them aside.
Step #5: Reattach Doors
Next, align the hinges on your doors with the screw holes in your cabinets. The hole in the hinge will usually be oblong to allow for adjustment later. Drive one of the screws you just removed through the oblong hole in the hinge and into the pre-drilled hole in the style. To avoid stripping the screws, don’t tighten the screw all the way. Repeat this for the second hinge.
Step #6: Tighten Screws
Now, tighten the screws the rest of the way. This will help you to feel the torque and will prevent breaking or stripping of the screw. Repeat these steps for all the remaining doors.
Step #7: Adjust Hinges to Close Gaps
Once you have all your doors installed, you will want to adjust the hinges to make the doors are level at the top and avoid gaps in between. First, adjust the forward facing screw in the hinge. This will help to move the door left or right about a quarter of an inch each way and will close the gap between the doors.
Step #8: Adjust Hinges to Level Doors
Next, adjust the screw facing the center style of the cabinet. This will move the doors up or down a quarter of an inch to level the doors at the top. If you need more of an adjustment than a quarter of an inch, you may need to loosen the screws you used to hang the cabinet, lift the door, reposition the screw in the hinge’s oblong hole, and drive the screws back in.
Step #9: Add Finishing Touches
The doors are now in place, so you can install the handles and hardware.

Feel free to stop into Builder Supply Outlet or the Edge Showroom with any home improvement questions you may have regarding kitchen cabinets, remodeling, construction, contractors, designing/installing a new kitchen or bathroom — or anything else. We can help you through the entire design and installation process from A-Z. Or call us anytime in Broadview, IL at 1-708-343-3900. You can also make an appointment to meet with one of our Edge Kitchen and Bathroom designers at no charge by clicking here.


- My account Cart
-
OPEN TO THE PUBLIC | Store Hours and Information708.343.3900 OPEN TO THE PUBLIC Store Hours and Information
- 708.343.3900 Español Schedule Your FREE
Design Consultation