-
Mixing Grout Made Easy
Mixing Grout Made Easy
 Share on Facebook
April 11, 2017
Grout is the putty-like filler between tiles. It keeps tiles sealed, solid, and in place.
Unfortunately, when grout is not clean, smooth, and uniform, it makes your tile look bad. Therefore, you must pay close attention to creating excellent grout lines. To do this, you must mix the grout correctly, so it spreads on with ease and produces nice even lines between each tile. This is what you call the “finishing touch” on your tile job.
BEFORE YOU BEGIN
Before you mix any grout — you have to make some decisions in the selection and prep processes.
First and foremost, you must choose between sanded or un-sanded grout. If the joints between the tiles are under ⅛”-thick, un-sanded grout is will be easier to use and give better adhesion in those narrow spaces. For thicker joints such as ⅛- to ½”-thick, you need to go with sanded grout. It’ll be your best option for bonding and produce far less shrinkage.
POLYMER ADDITIVE
Many tilers favor grout with a polymer additive. The idea is that it helps grout dry to an even harder final product and should better resist staining. When it comes to bathrooms, consider a grout that includes a fungicide to help resist mold growth. This is very important.
QUICK TIP
Avoid mixing grout with well water or hard water. Their minerals can cause efflorescence; an unattractive white residue that forms when moisture seeps into the grout. If you’ve got well or hard water in your area, use distilled water for mixing.
Also, resist the temptation to use a corded drill with a paddle attachment to mix your grout. Automated mixing can introduce too many air bubbles, weakening the grout, and potentially causing discoloration.
REQUIRED MATERIALS AND TOOLS
To grout your tile, will require the following materials and tools…
- 2-gallon Bucket
- Grout-mixing Knife or Small Trowel
- Grout Mix
- Distilled/Soft Water
- Drywall Sponge or a 6”-plus Kitchen Sponge
LET’S GET STARTED
STEP #1
Pour about a quarter, to as much as half of the grouting powder into the bucket. Always put in extra just in case you get the water-to-powder ratio wrong during the mixing process.
Always refer to the manufacturer’s mixing directions for how much water to add. Use a fraction less water than recommended, as you can always add more later. Look at preparing grout as similar to making cake batter — as recipe amounts can change depending on humidity.
STEP #2
Turn the bucket onto about a 45-degree angle. This makes it much easier to see the contents so you can mix them thoroughly. Add water (remember, less is more), and stir with the grout-mixing knife or small trowel. Mix until all the powder is blended. And remember to make sure to remove all lumps.
STEP #3
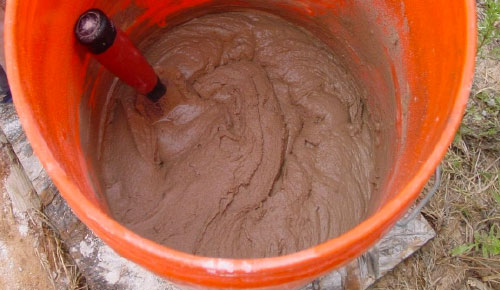
Check the grout’s consistency. It should resemble creamy peanut butter or be akin to soft bread dough, where you can grab a handful and it maintains its shape. If squeezed slightly, it shouldn’t leak water.
If your grout is too slack or liquid-y, or has a cake icing consistency, add some more powder and mix it well. If you leave it too thin, it’ll shrink too much after it’s applied and crack. Good grout will take a bit of effort to push into your tiles.
If your grout is too dry and clumpy, simply moisten the sponge with water and squeeze a dribble of water into the grout mix. Do this in gradual additions until achieving the right texture (as described).
STEP #4
Allow the grout to rest for 5-10 minutes so the chemicals can bond. During this rest period, moisture will fully permeate all the powder. Without resting, your grout will be weaker and prone to chipping and cracking. The grout should thicken after 10 minutes or so.
STEP#5
Mix your batch of grout thoroughly and apply it.

Feel free to stop into Builder Supply Outlet or the Edge Showroom with any home improvement questions you may have regarding tile, grout, backsplash, windows, kitchen cabinets, remodeling, construction, contractors, designing/installing a new kitchen or bathroom — or anything else. We can help you through the entire design and installation process from A-Z. Or call us anytime in Broadview, IL at 1-708-343-3900. You can also make an appointment to meet with one of our Edge Kitchen and Bathroom designers at no charge by clicking here.


- My account Cart
-
OPEN TO THE PUBLIC | Store Hours and Information708.343.3900 OPEN TO THE PUBLIC Store Hours and Information
- 708.343.3900 Español Schedule Your FREE
Design Consultation